| CONVERSATION BASICS
Conversations are an important aspect of NWN2 gameplay. They are used to talk with companions, trade with a merchant, and get quest information from NPCs. At its heart, a conversation is really just a branching menu, so a conversation doesn't necessarily have to be two people talking - if you want a player to encounter an inanimate control panel with three switches, a conversation with three responses would be an effective way of representing the situation. ANATOMY OF A CONVERSATION Conversations can appear complicated at first, but you will soon be able to write them quickly.
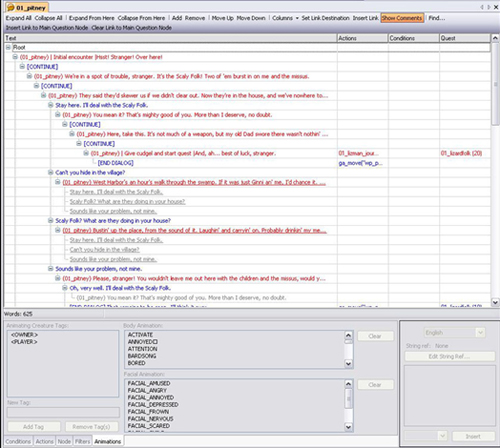
This screenshot shows a portion of Pitney's conversation in the Sample Module, 0100_UninvitedGuests. Conversations (sometimes referred to as dialogues) are arranged in a branching tree, not unlike a folder directory in Windows. Each row or line in the conversation is referred to as a node. The leftmost section is the text, which is what is displayed to the player.
Red nodes are lines that are spoken by the NPC. Blue nodes are the player's responses. A blue "[CONTINUE]" means that the player has no choice to make at that node. In these cases, the conversation will proceed to the next red line, allowing an NPC to make multiple statements before the player responds. 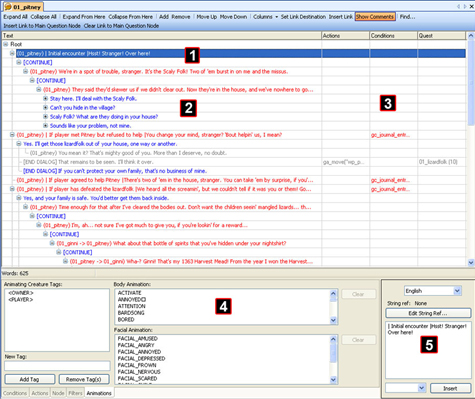
1. The text for the currently selected node. All of the information in the Node Properties section (D) refers to this node.
2. A series of options from which the player can choose. After the preceding red node fires, the player will see these options and can click on (or press the number of) the one he wishes to select. Note the + sign to the left of these nodes, which shows that they can each be expanded.
3. Other node information. By right-clicking on this region (choose "Columns") you can set which columns of information will be displayed. In this screenshot, you can see Actions, Conditions, and Quest information for each node.
4. Node Properties. This section contains more details on the selected node.
5. Text. The text for the selected node is shown here. Just click on the text box and type to change what the NPC says (red node) or what player option is presented (blue node).
The grey nodes are links to other nodes within the conversation. Using links prevents you from having to type the same line for the same situation. 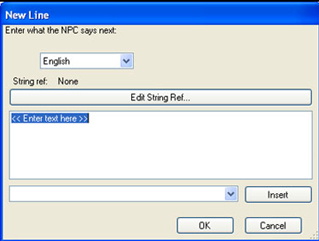
To add a node to a conversation tree, just right click on the preceding node and choose Add. A "New Line" window will appear. Just type in the text you'd like the player to see. (The language selection Dropdown Menu and the "Edit String Ref" button will not apply to your modules, but are used for the official campaign.)
CONVERSATION SCRIPTING BASICS
Scripting in NWN2 is very powerful and can be complicated. In creating the official campaign, we had many scripters who are a specialized type of designer (or a specialized type of programmer, depending upon your perspective) who spent their time mastering the scripting tools and possibilities, creating new global scripts to be used in area creation. The details of scripting are beyond the scope of these HowTos, but we'll discuss some of the very basics in the context of how scripts can be used in conversations. The best way to learn more about scripting is to experiment with the Sample Module and see how we were able to create it. Then play around with conversations and scripts in your own modules.
Conditions
Conditions are test scripts that are attached to a conversation node and are either TRUE or FALSE. When a condition is TRUE, then that conversation node fires (is executed). For example, you might have an NPC who has two possible greetings: the first is warm and friendly while the other is cold and standoffish. If you placed a condition script on the first node to check if the player is an elf, then elves would get the warm greeting and other races the cold one. In this case, the condition script is being used to help establish the personality of an NPC.
In the Sample Module, conditions are used to determine which of Pitney's dialog nodes will be displayed, based upon the player's quest state. If the player declined to help Pitney, then the poor fellow pleads again with the player. If the player has killed the lizardfolk, then Pitney expresses his gratitude. 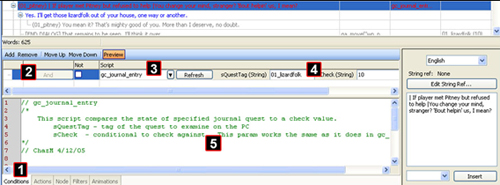
If a condition is not met, then the player will never see that conversation node. For a series of player responses (blue nodes), this might mean that the player only sees 3 of the 4 possible choices. For an NPC statement (red nodes), the first node whose conditions are met is shown. If you experiment with the Sample Module, you will notice that there are 5 initial nodes for Pitney. Which one the player sees depends upon what has happened so far.
1. Node Properties Tabs. These tabs let you view different properties of the conversation node. (In this screenshot, the Conditions tab is shown.)
2. Condition Operators. If a node has multiple conditions, you can specify "And" or "Or" to indicate whether they must all be true or if only some of them need to be true for the node to fire.
3. Script Name. This text box contains the name of the condition script. In this case, the global script gc_journal_entry, which checks a journal (quest) entry, is being used.
4. Script Parameters. The remainder of the row for each condition shows what parameters are passed to the condition script. In this case, the parameter sQuestTag is given the value "01_lizardfolk" and the parameter sCheck is given the value "10." The use of script parameters is very powerful and allows a single script to be used in dozens of conversations. For example, gc_journal_entry can be used to check any state for any quest in the entire game! The use of parameters for scripts is a new function of the NWN2 toolset. [Note: If you add a global script to Conditions or Actions, or swap one script for another, click the "Refresh" button to set the appropriate parameters for the new script.]
5. Script Code. The documentation and code for the condition script is shown in this window.
Actions An action is a script that is used to accomplish a wide variety of tasks. An action script is executed when a conversation node fires. For example, an action could cause an NPC to become hostile to the player, move the player to another map, or place gold in a treasure chest. In the Sample Module, an action script is used to reward the player with experience points for completing his quest for Pitney. Action scripts are set for nodes similar to how condition scripts are set. WRITING A CONVERSATION
Let's try writing a conversation for victim of the lizardfolk holed up in Pitney Lannon's house. The player can talk to this person after dispatching the lizardfolk.
To create a new conversation, use the Dropdown Menu at the top of the Toolset and select File - New - Conversation. 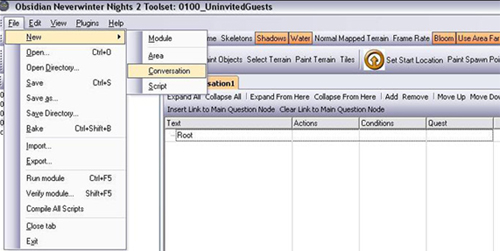
Your new dialogue will be entirely empty, save for the Root node. As mentioned in the earlier overview of a conversation, you can add your first line by right-clicking on the Root node and selecting "Add." This will bring up the New Line window where you can input the first line of the dialogue. Note that the first line after the root is always an NPC line. 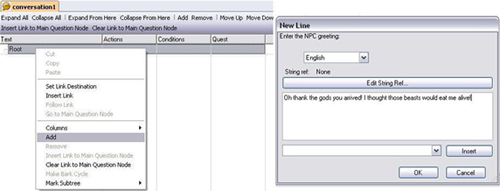
Once you hit "OK" the New Line is added and you have the introductory line for the victim. 
If you were to add a line to this red NPC line, you'd be adding a player response node. If you wanted the NPC to say two lines before the player responded, you'd have to make an empty player node between the red NPC nodes. Try adding a blank line to the introduction. 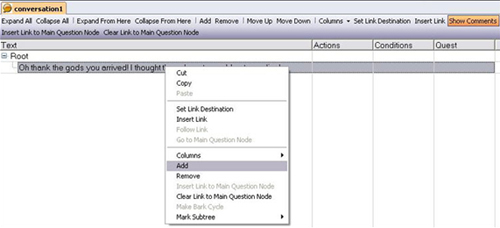

End Dialog? If a Player node has NO responses attached to it, it is a conversation-ending node. Let's see what happens if we add another NPC line after the highlighted, empty PC line. 
The blue player node switched to [Continue] now that an NPC line follows it. Now that the NPC has said two lines, let's add some player response nodes. To give a player multiple possible responses at one time, add multiple times to the same node. If you want three possible responses to the "I can't feel my leg." line, right-click then "Add" on that line three times. 
Now you have three possible PC responses to that line. Fill in text for each line by clicking on the line, and then typing in the text box (lower-right of the dialogue editor with the "Insert" button). 
Since these lines don't yet have any text following them, they are dialogue-enders. If you'd like, you could continue to add NPC nodes, and subsequent player nodes, to your heart's content. The basics of adding lines are quite simple.
|


